Real-time data analytics is proving to be the next big wave in Big data and Cloud computing and in a computing context, there’s an increasing demand to derive insights from data just milliseconds after it is available or captured from various sources.
NoSQL databases have become widely adopted by companies over the years due to their versatility in handling vast amounts of structured and unstructured streaming data with the added benefit to scale quickly with large amounts of data at high user loads.
Why MongoDB?
MongoDB has become a prominent powerhouse among NoSQL databases and is widely embraced among many modern data architectures. With its ability to handle evolving data schemas and store data in JSON-like format which allows us to map to native objects supported by most modern programming languages.
MongoDB has the ability to scale both vertically and horizontally which makes it a prime choice when it comes to integrating large amounts of data from diverse sources, delivering data in high-performance applications, and interpreting complex data structures that evolve with the user's needs ranging from hybrid to multi-cloud applications.
Why Parquet?
Storage matters! I/O costs really hurt and with more multi-cloud distributed compute clusters being adopted, we would need to consider both the disk I/O along with the network I/O. In a Big data use case, these little costs accrue both in terms of compute and storage costs.
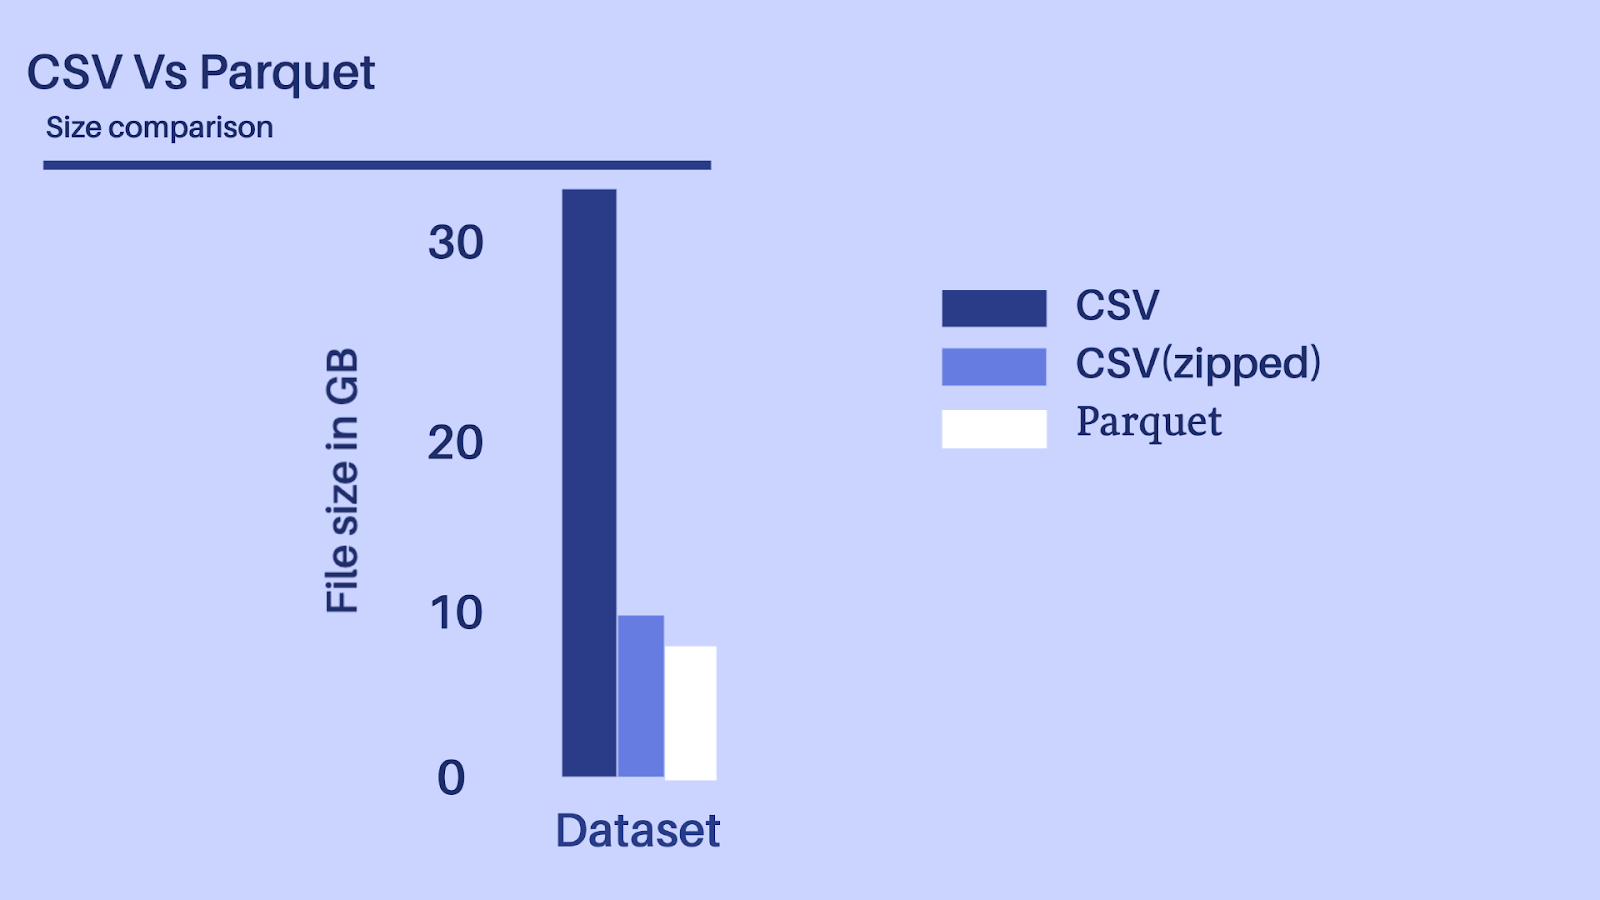
Considering the above-depicted scenario, let’s presume we have a dataset with 100+ fields of different datatypes, it would be unwise to ingest a 30+ GB file even by using a distributed processing system like Spark or Flink.
Parquet data format is more efficient when dealing with large data files and goes hand in hand with Spark which allows it to read directly from a Spark data frame while preserving the schema. At the same time, Parquet can handle complex nested data structures and also supports limited Schema evolution to accommodate changes in data like adding new columns or merging schemas that aren’t compatible.
Is Delta Lake the new Data Lake?
Databricks leverage Delta lake which helps accelerates the velocity at which high-quality data can be stored in the data lake and in parallel, provide teams with leverage to insights from data in a secure and scalable cloud service.
Key highlights among its features include
- Leveraging spark distributed processing power to handle metadata for Petabyte scale tables.
- Act interchangeably as a batch table, streaming source, and data sink.
- Schema change handling that prevents insertion of bad records during ingestion.
- Data versioning allows rollbacks, builds historical audit trails, and facilitates rebuildable machine-learning experiments.
- Optimize upserts and delete operations that allow for complex use cases like change-data-capture (CDC), slowly changing dimension (SCD), streaming upserts, and so on.
Core Striim Components
- MongoDB reader: MongoDBReader reads data from the Replica Set Oplog, so to use it you must be running a replica set. In InitialLoad mode, the user specified in MongoDBReader's Username property must have read access to all databases containing the specified collections. In Incremental mode, the user must have read access to the local database and the oplog.rs collection.
- Continuous Query: Striim Continuous Queries are continually running SQL queries that act on real-time data and may be used to filter, aggregate, join, enrich, and transform events.
- ADLS Gen2 Writer: Writes to files in an Azure Data Lake Storage Gen2 file system. When setting up the Gen2 storage account, set the Storage account kind to StorageV2 and enable the Hierarchical namespace.
- Stream: A stream passes one component’s output to one or more other components. For example, a simple flow that only writes to a file might have this sequence.
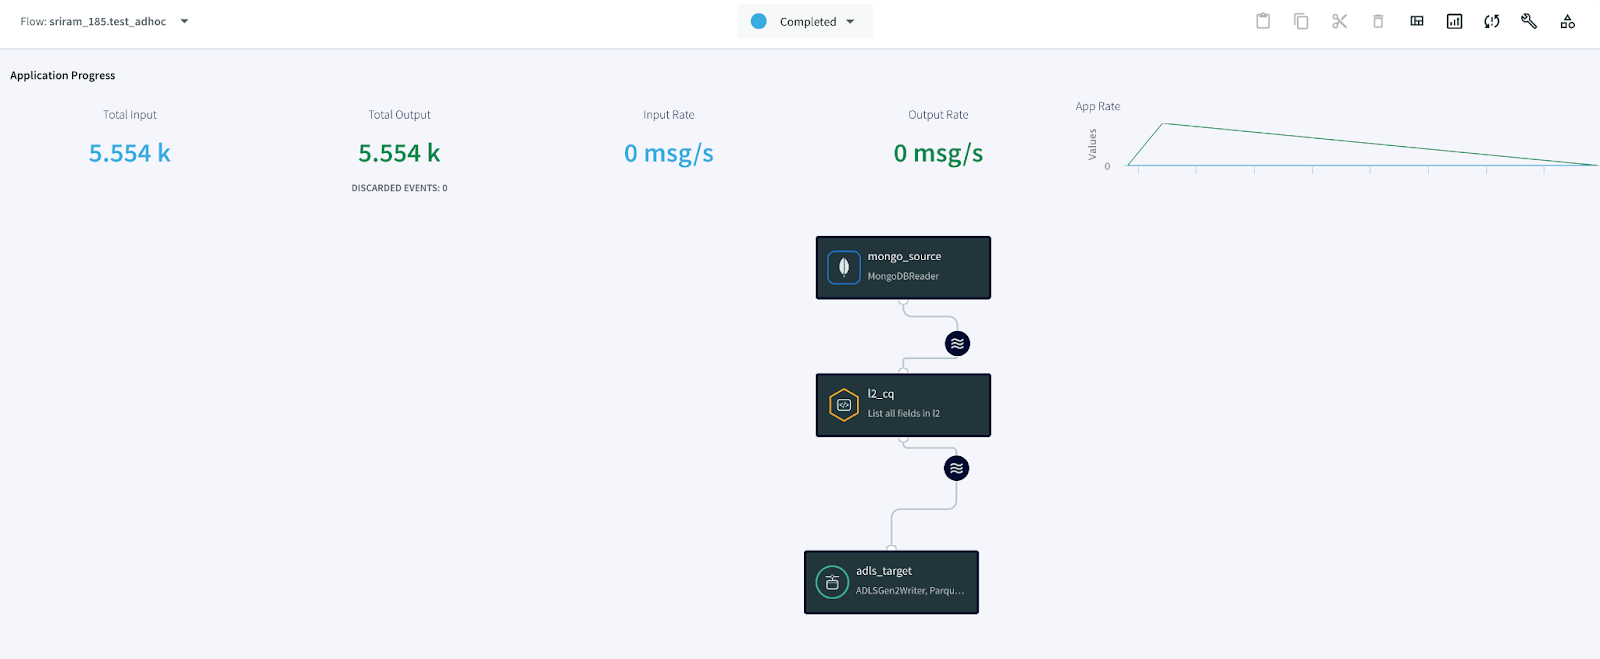
- Dashboard: A Striim dashboard gives you a visual representation of data read and written by a Striim application.
- WAEvent: The output data type for sources that use change data capture readers is WAEvent.
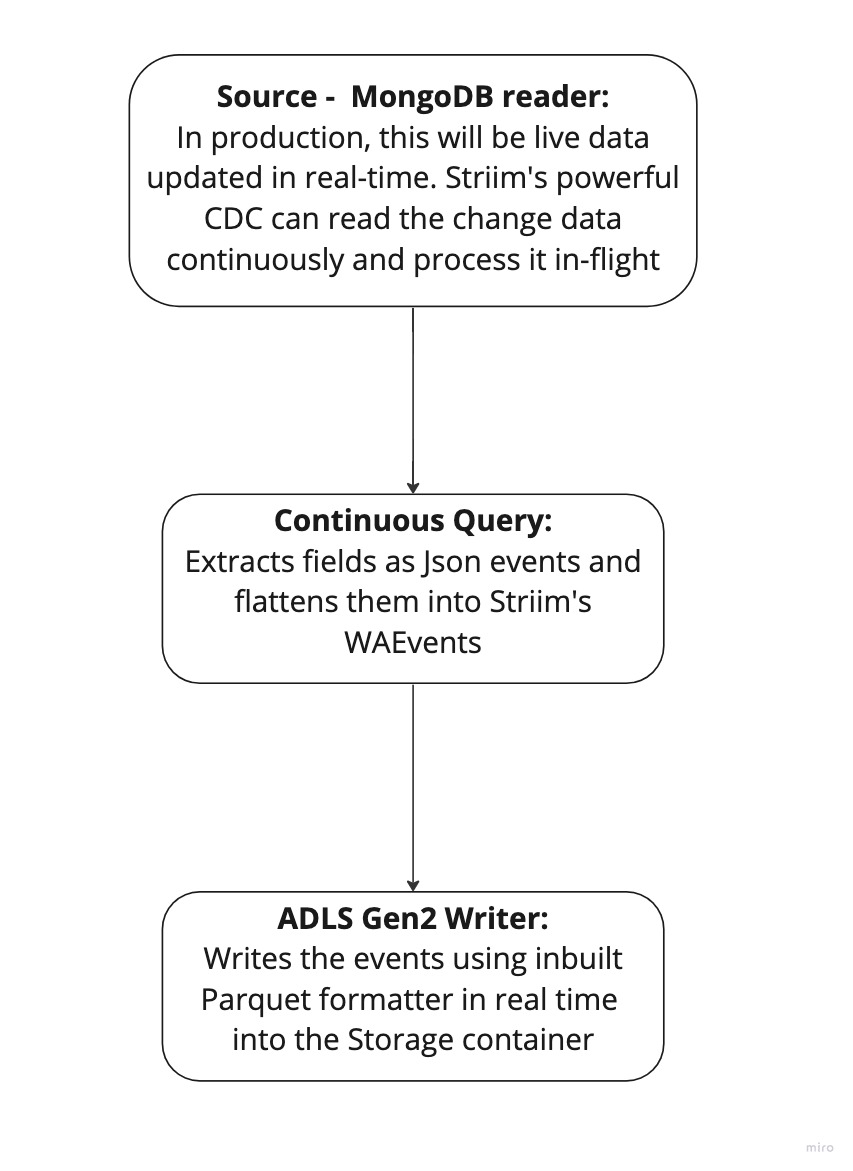
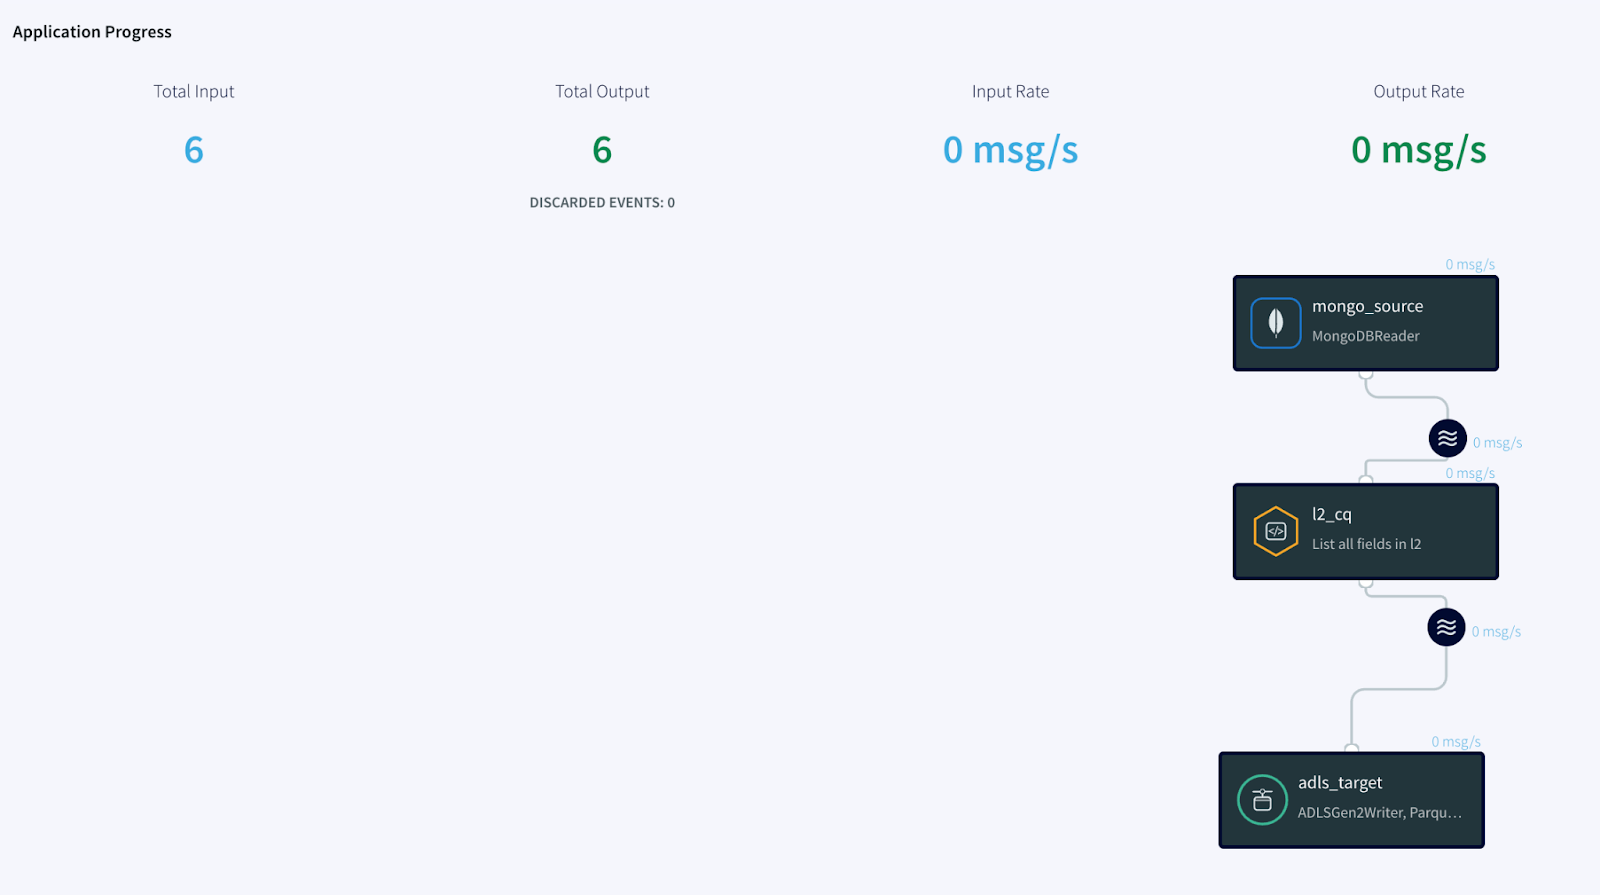
Simplified diagram of the Striim App
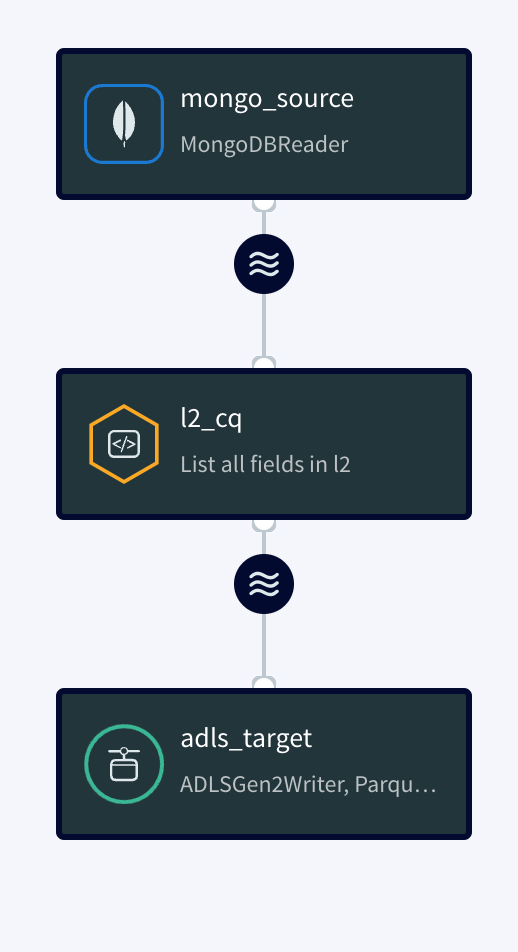
The Striim app in this recipe showcases how we can stream the CDC data from MongoDB as Json events and convert them into Parquet files before placing them into Azure’s ADLS Gen2 storage account. The same Striim app can be used to perform historical or initial loads and seamlessly convert into an incremental application once the historical data is captured.
We use the Continous Query to extract the fields from the JSON events and convert them into Parquet files using the Parquet formatter built into ADLS Gen2 writer. Once the data lands, Databricks provides us the option to convert these parquet files into a Delta table in-place.
In a production setting, Striim’s Change Data Capture allows for real-time insights from MongoDB into Databricks Delta tables.
Feel free to sign up for a Free trial of Striim here

Step 1: Setting up MongoDB Atlas as a source
MongoDB Atlas is a Database as a service (DBaaS) and a fully managed cloud database that handles the complexity of configuring and deploying in the cloud provider of our choice(AWS, Azure, and GCP). Feel free to sign up for an account here.
If you are a new user, Complete the prompts to create an organization and a project which are needed in order to create a database cluster.
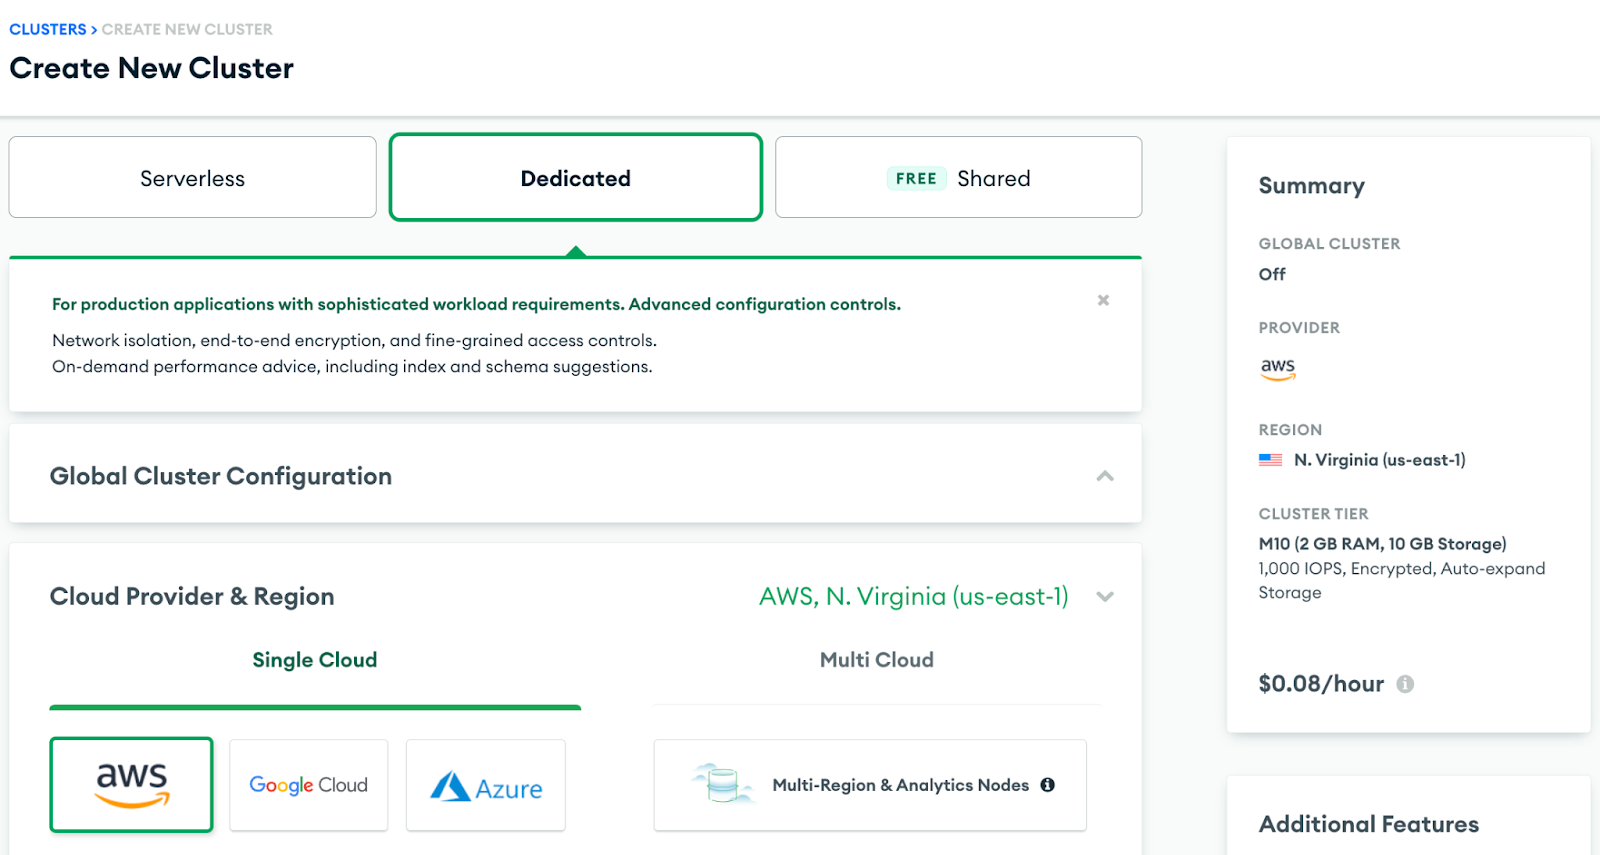
Note:
There are multiple cluster offerings to choose from MongoDB which are as follows: Shared cluster, Dedicated Cluster, and Multi-Cloud & Multi-region cluster. We will be using a Dedicated cluster in this recipe since the shared free tier cluster uses a shared opLog, and for security concerns, external services or applications aren’t given access to it.
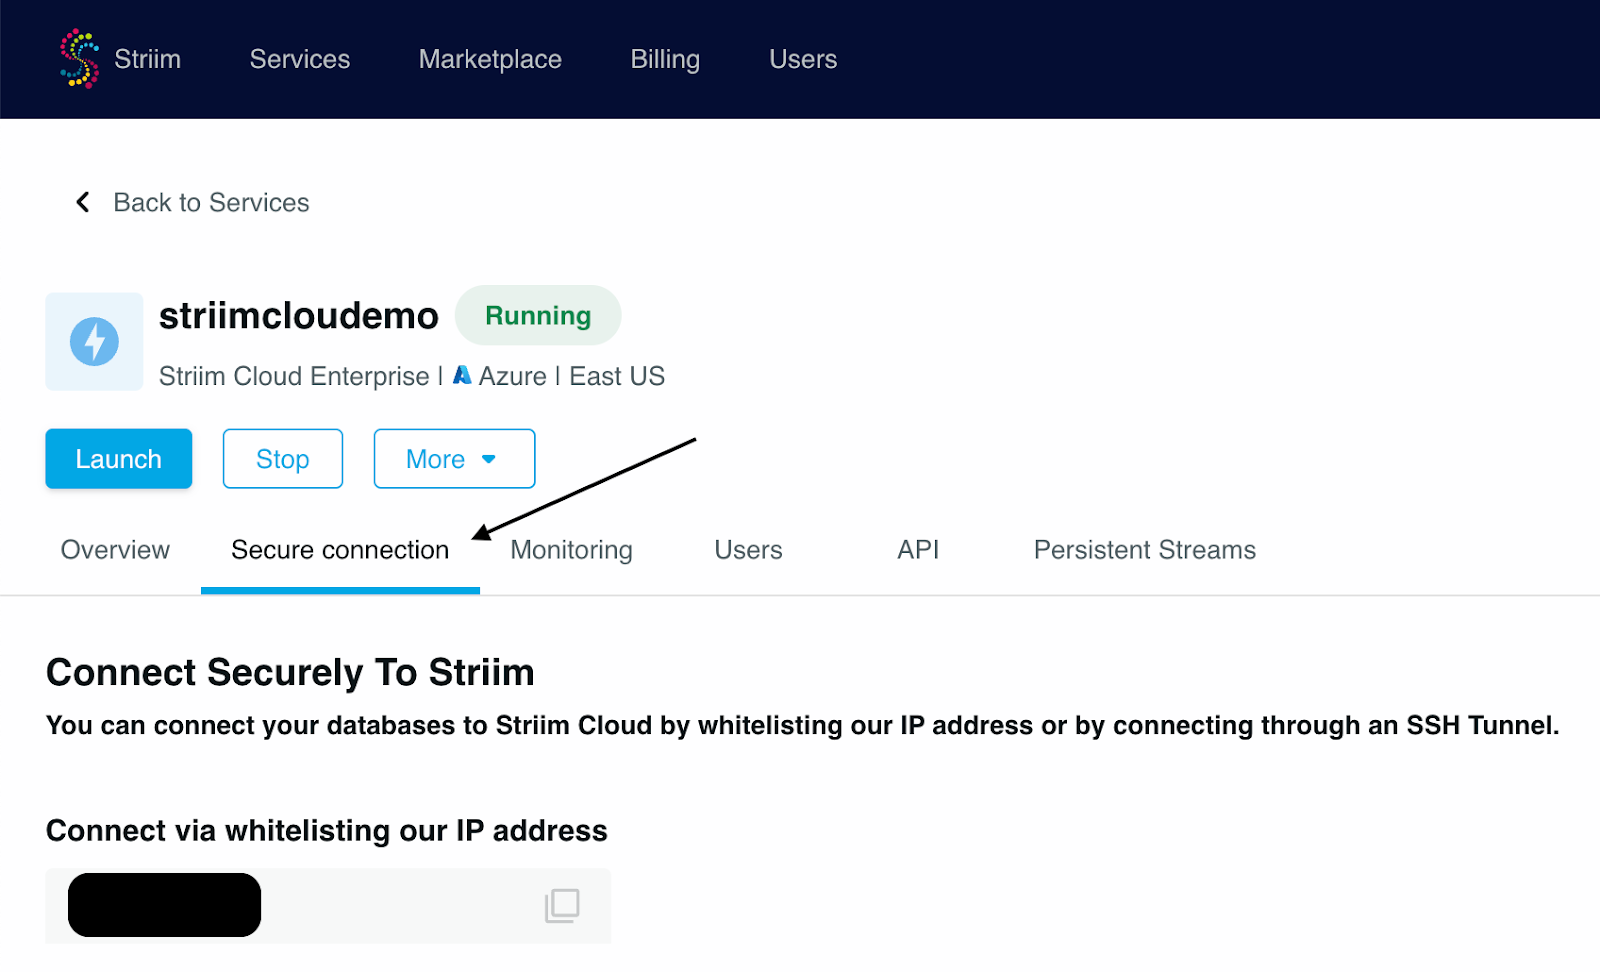
1. Once the Dedicated cluster is up and running, we would need to whitelist the IP for Striim Cloud which can be found under the Secure connection tab within the Striim cloud account.
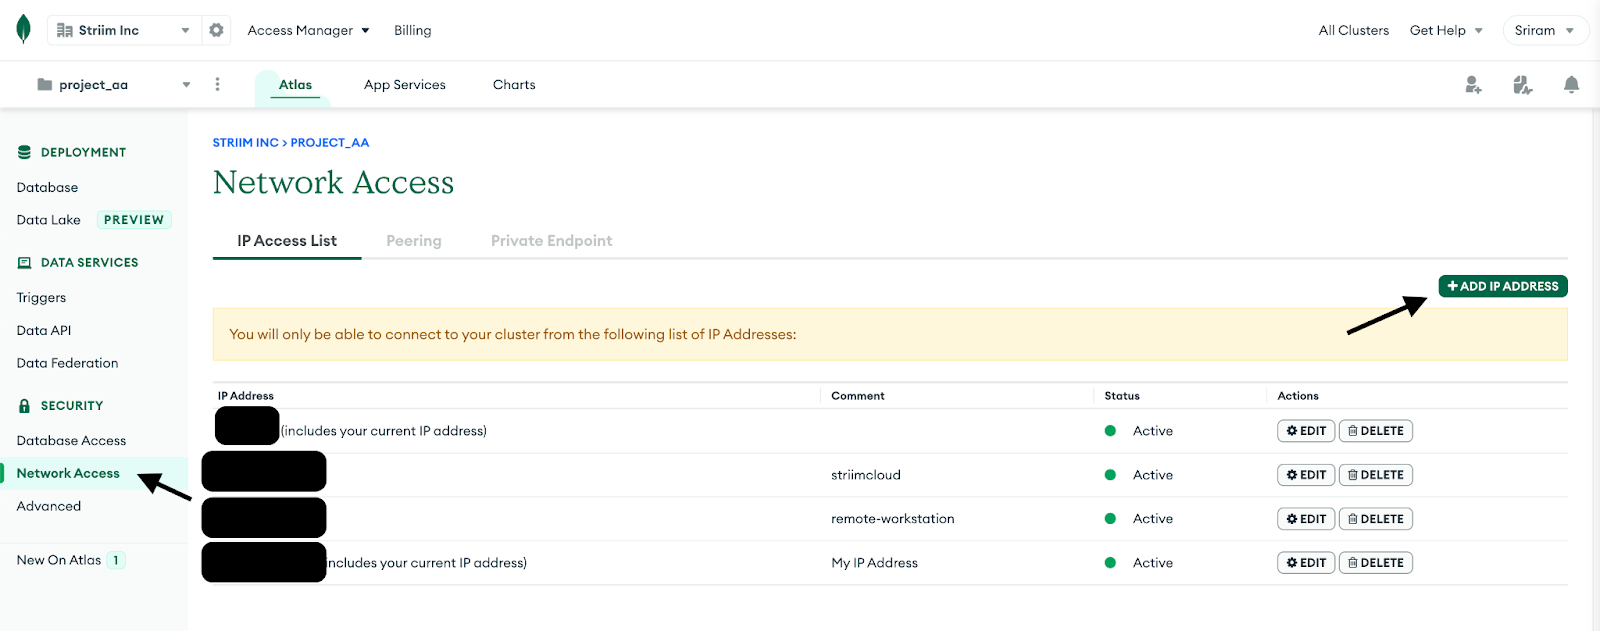
2. Navigate to Network Access under Security in the MongoDB account and whitelist the IP for any workstation that will be used along with the Striim App’s IP.
3. Create a database user for the cluster by navigating into the Database Access tab and make sure to add clusterMonitor role under the MongoDB roles. This is necessary for the Striim App to gain access to the OpLog and read the CDC data.

We can connect to the cluster using the mongosh or Mongo’s GUI tool called Compass.
MongoDB provides us the option to import test data via CSV or JSON document. For this recipe, we will use the sample airbnb dataset which is offered by MongoDB when a new database cluster is created.
Step 2: Configure the MongoDB Reader in Striim
Login to your Striiim cloud instance and select Create App from the Apps dashboard.
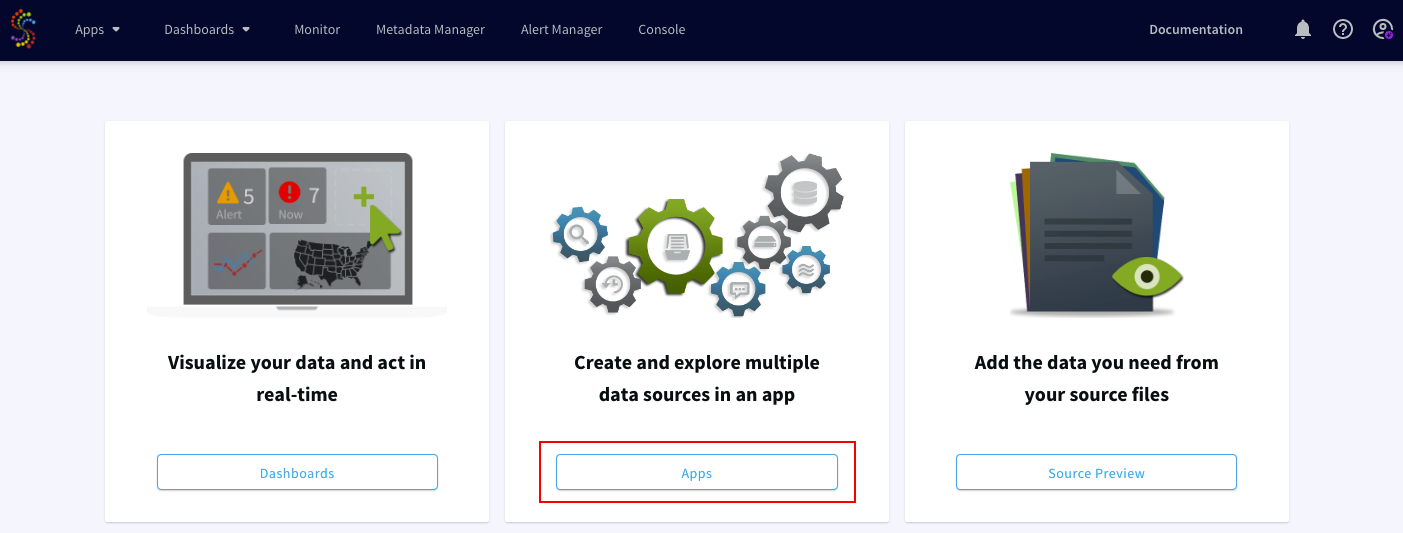
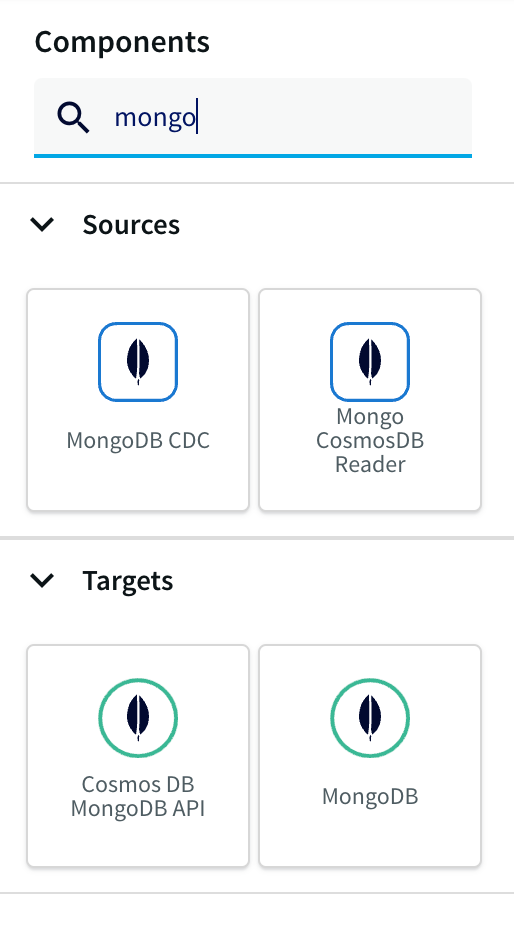
- Click on Start from scratch or use the built-in wizard by using keywords to the data source and sink in the search bar. Drag and drop the MongoDB CDC reader from Sources and enter the connection parameters for the MongoDB database cluster.
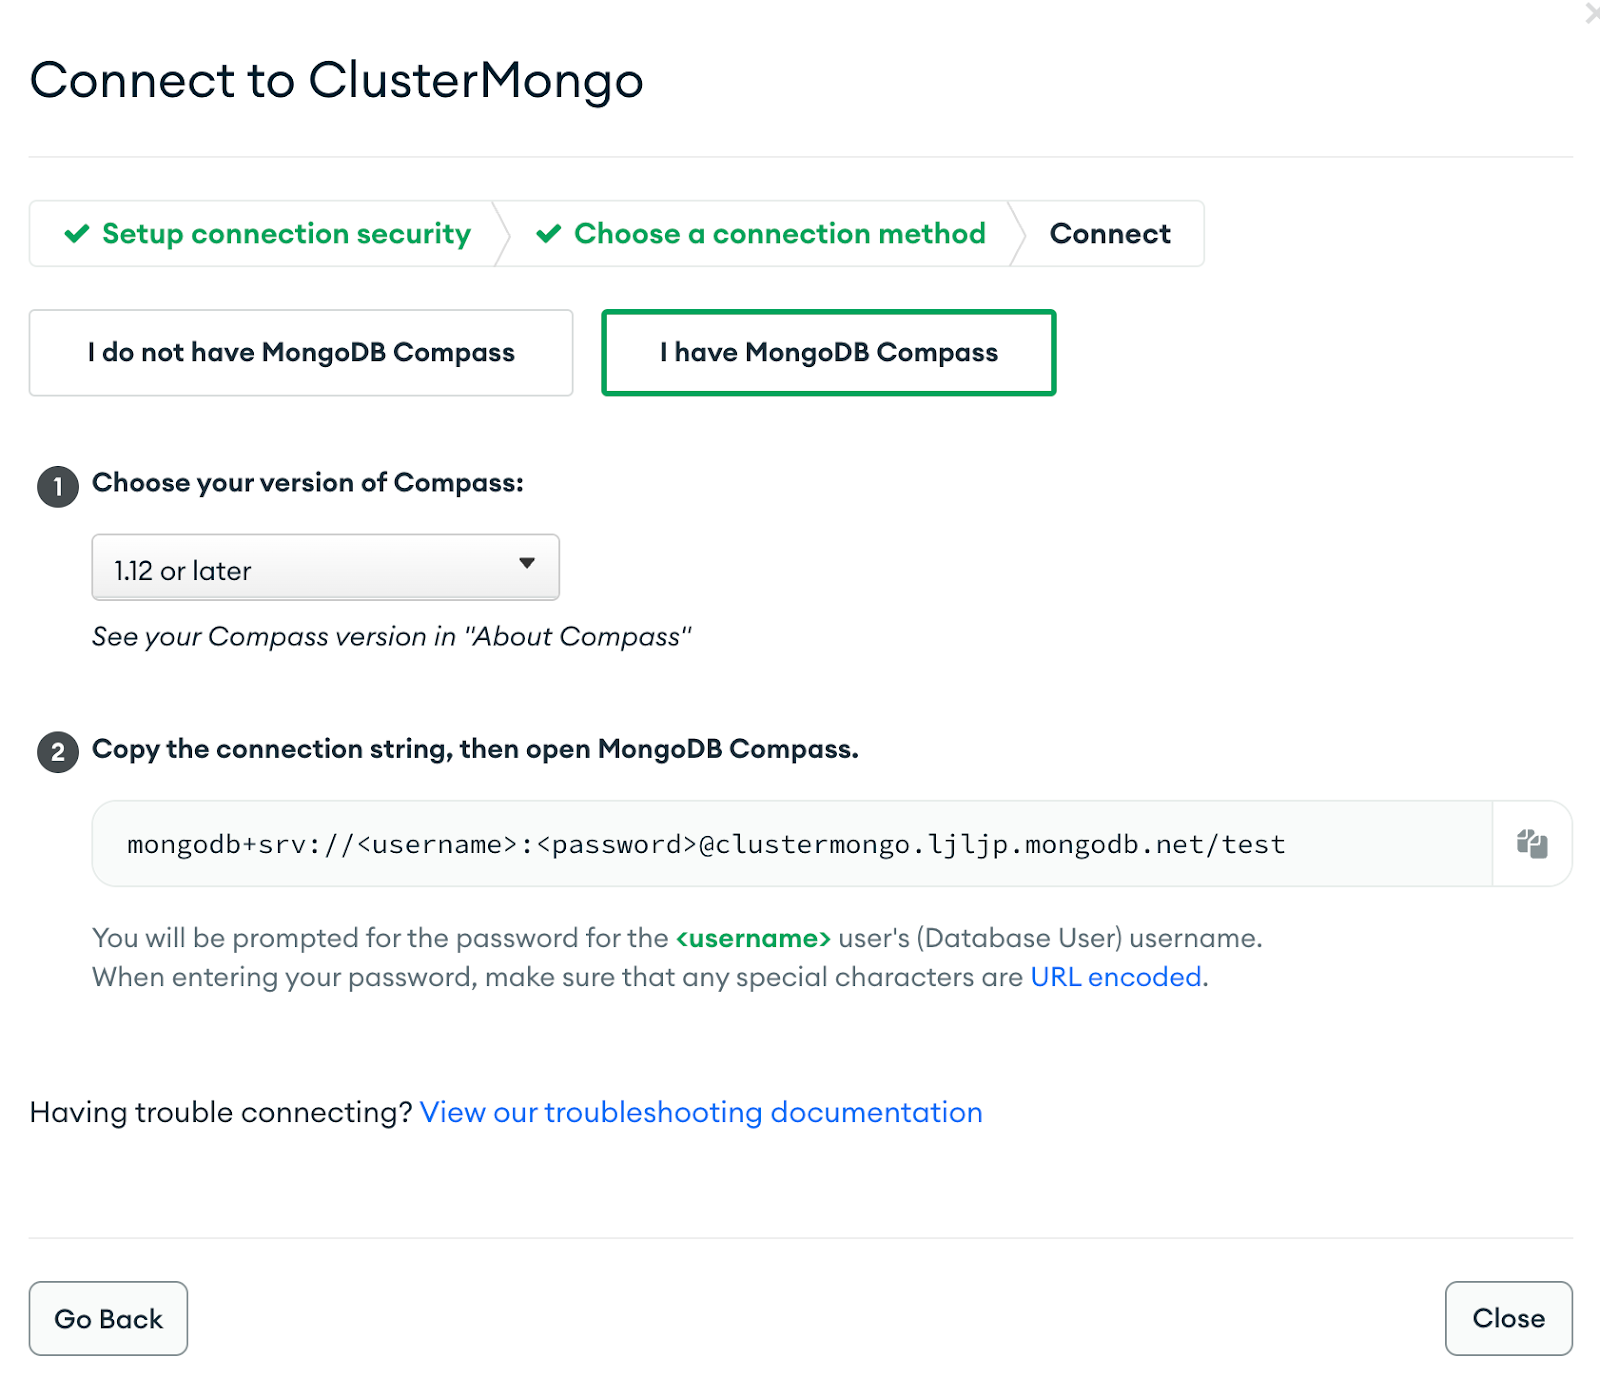
Obtain the Connection URL by navigating to the MongoDB account and click on Connect under the Database tab, and Select Connect using MongoDB Compass. We can use the same connection string to connect the Striim app as well.
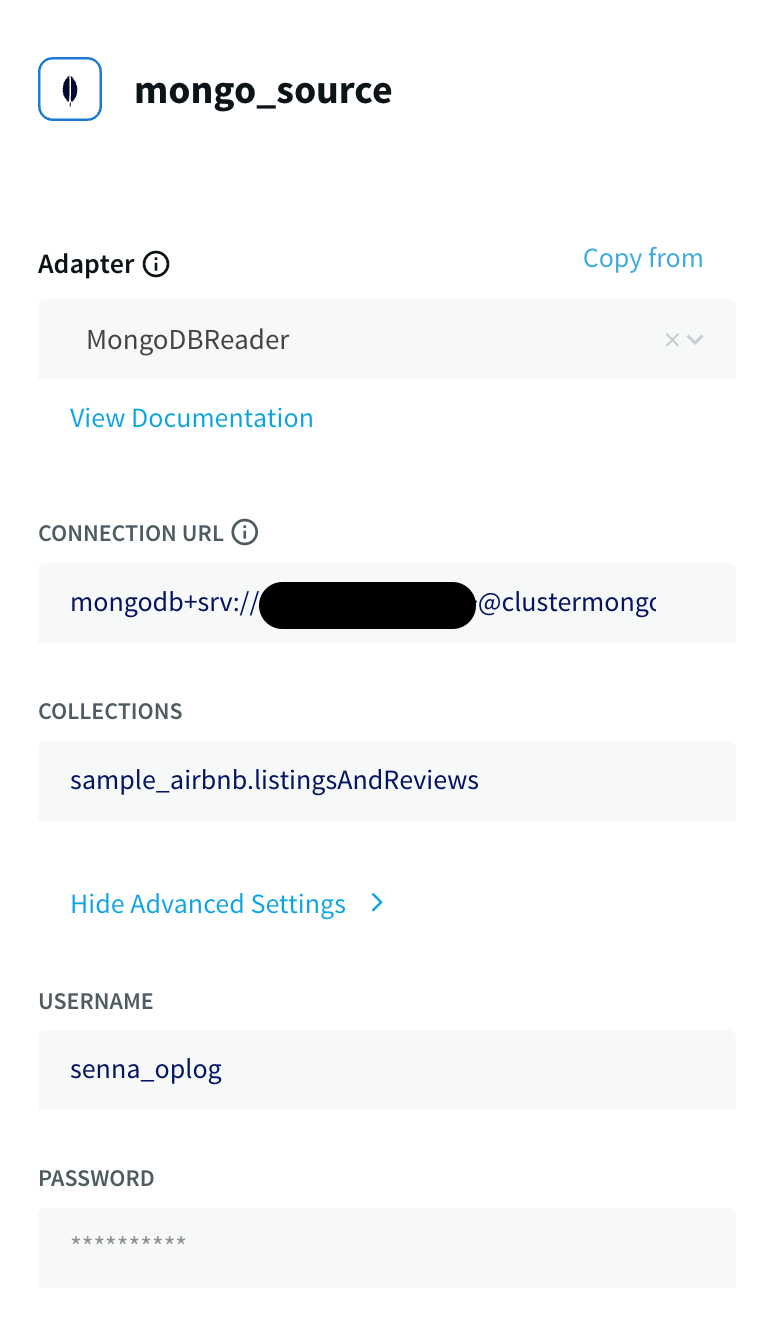
Enter the other connection URL from above along with the username, and password of the database user which has ClusterMonitor role which was created as part of Step 1. Select the type of ingestion as Initial or Incremental and Auth type as default or SCRAMSHA1.
Note:
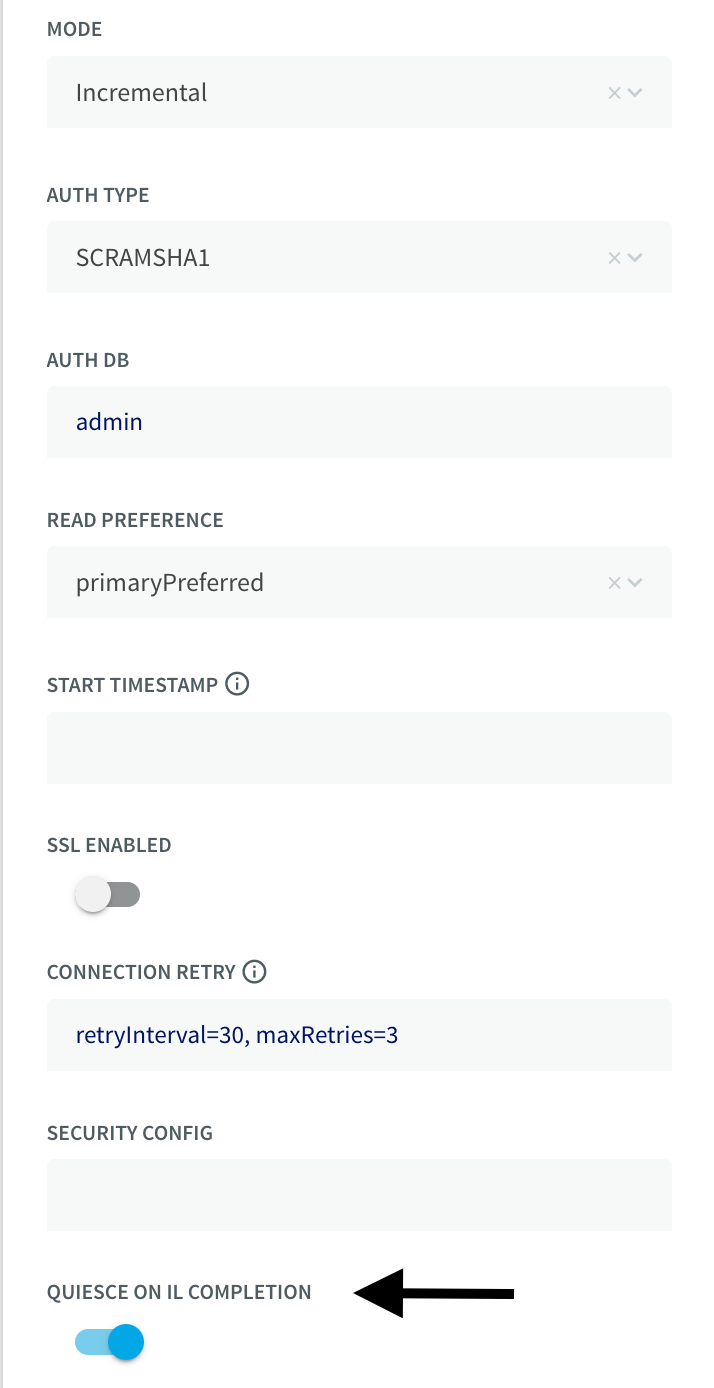
If the Striim app is configured to run Initial mode as ingestion first, do turn on the option for Quiesce on IL Completion. Set to True to automatically quiesce the application after all data has been read.
Step 3: Configure a Continous SQL Query to parse JSON events from MongoDB
A new stream is created after the MongoDB reader is configured which loads the Type in the stream as JsonNodeEvents. JSON’s widespread use has made it the obvious choice for representing data structures in MongoDB’s document data model.
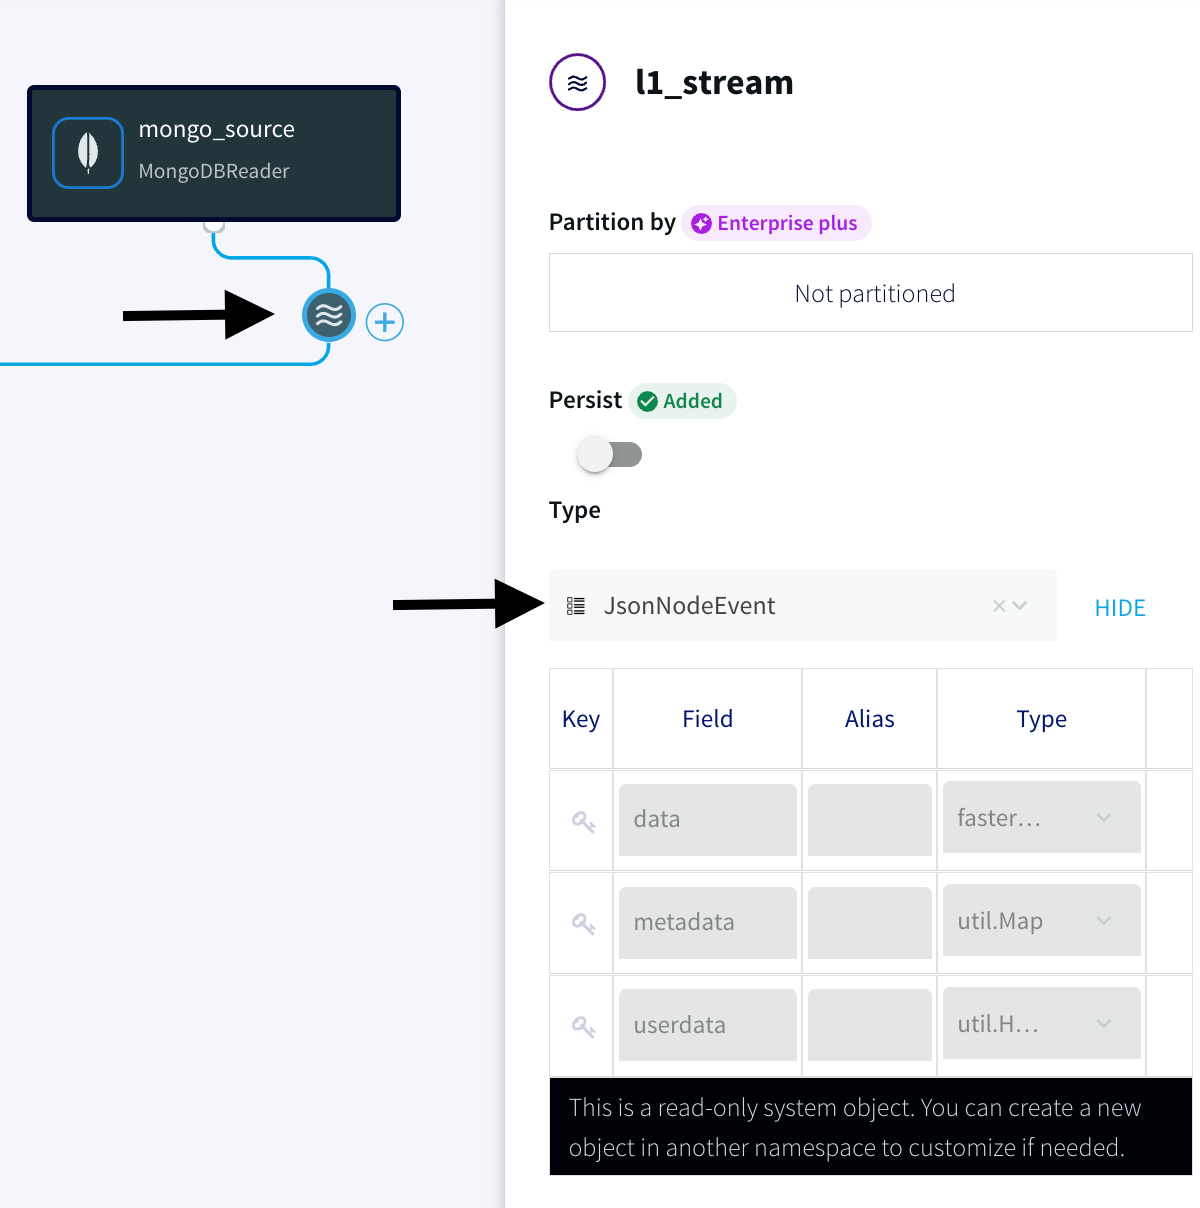
- Select the Continuous Query (CQ) processor from the drop-down menu and pass the following query to pull MongoDB data from the dataset that has been created. The query can be found in the following GitHub repository.
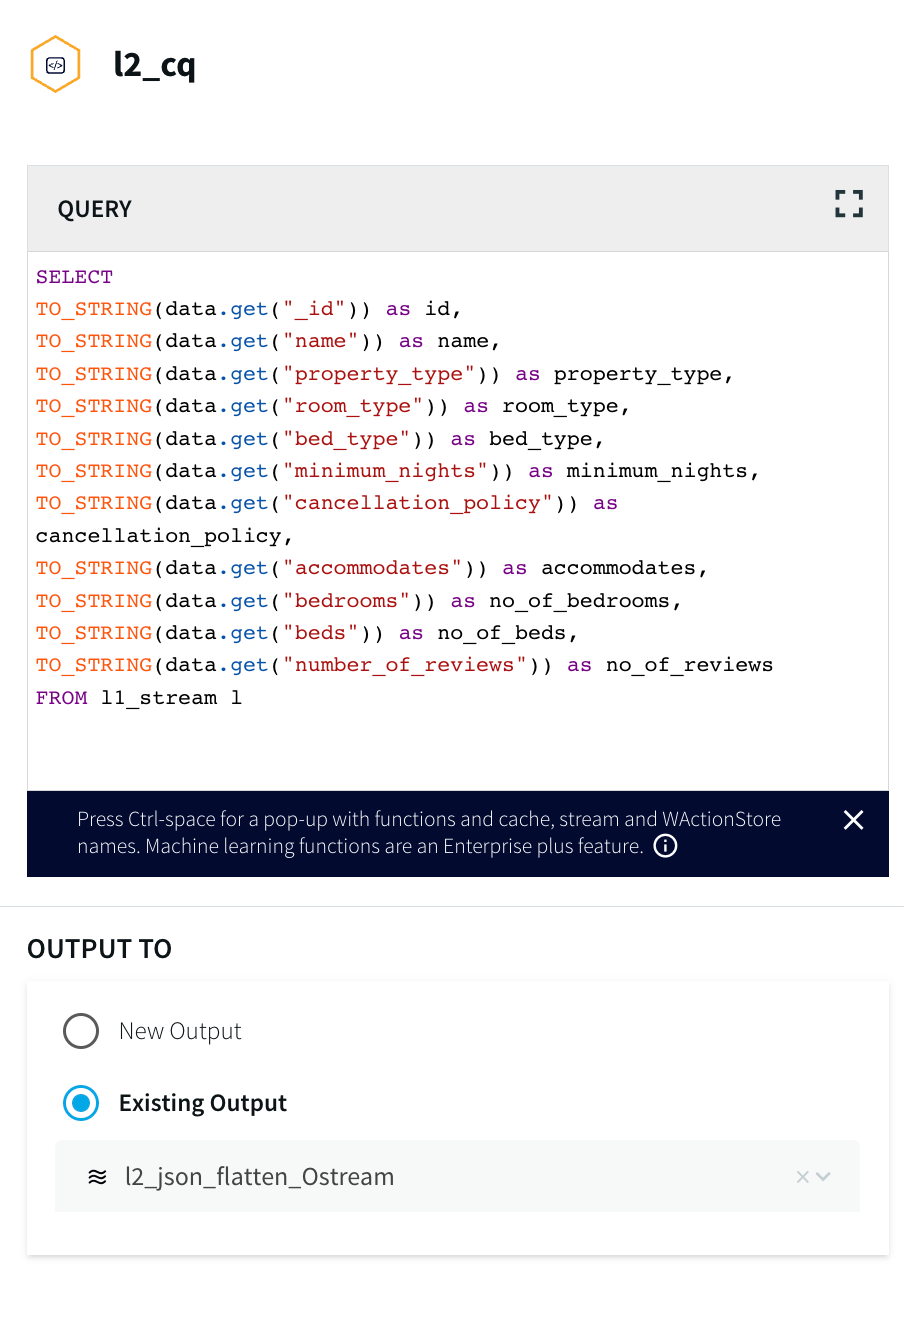
For more information on Continuous Queries refer to the following documentation and for using Multiple CQs for complex criteria.
2. Make sure the values under the Type have been picked up by the Striim app.
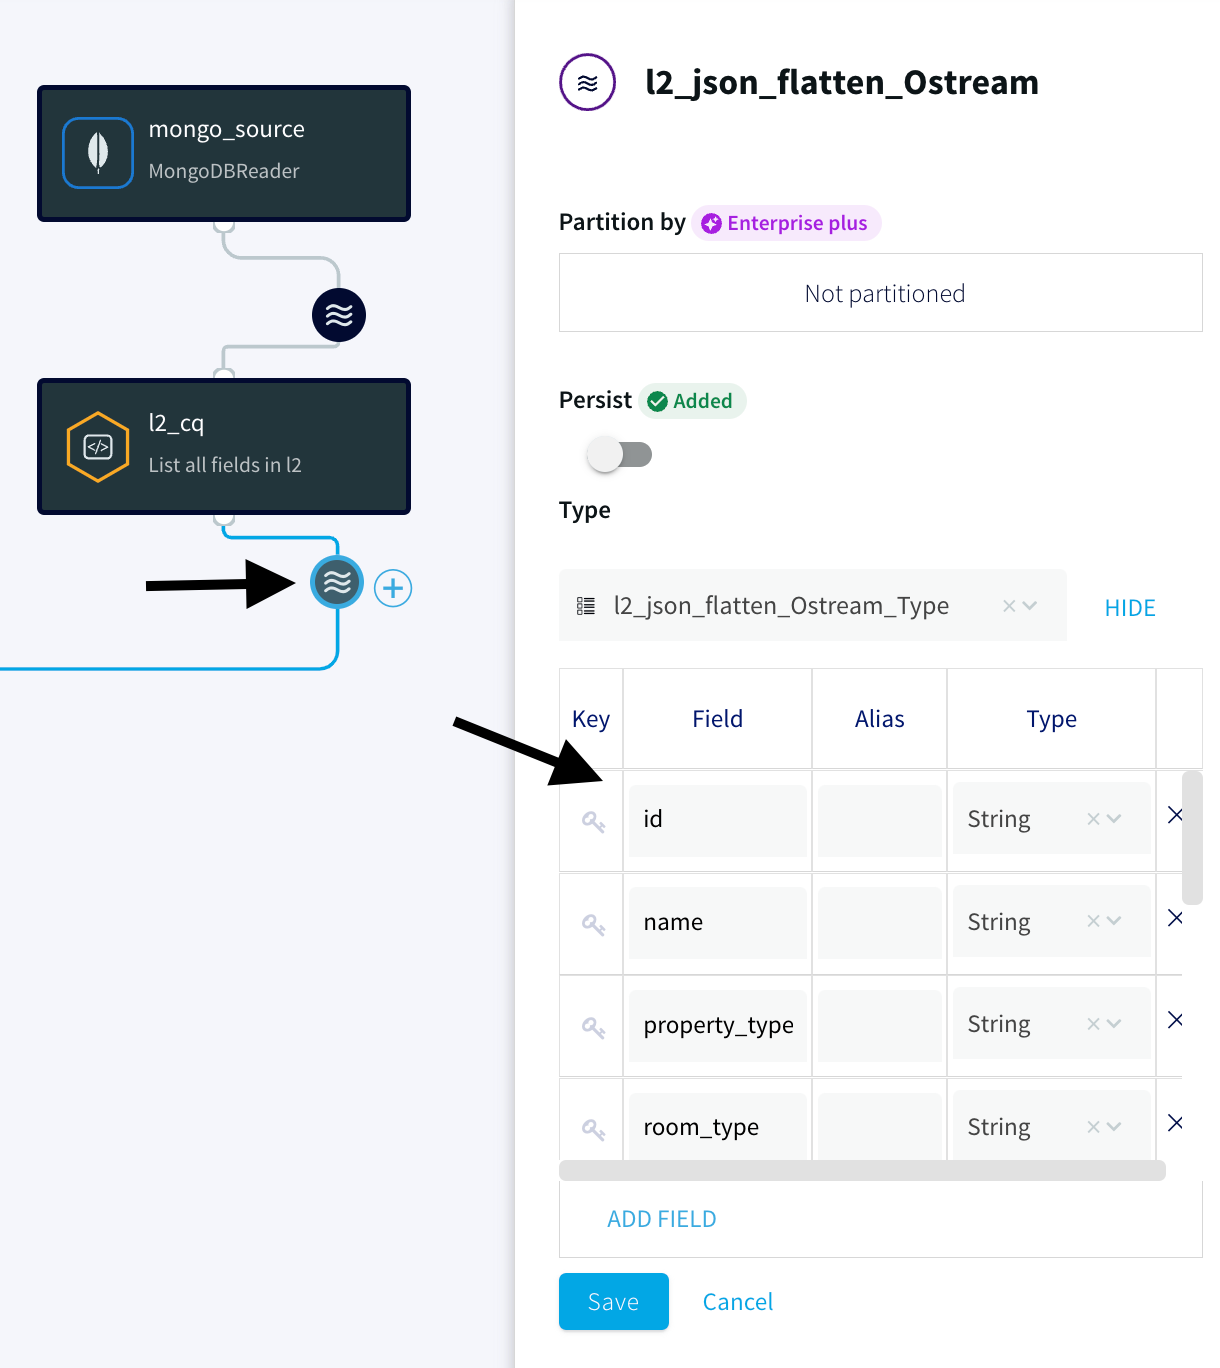
Note:
This allows the JSON events from MongoDB to be converted into WAEvent within Striim. This is necessary as part of the Parquet conversion process since the reader-parser combinations are not supported directly from JSON to Parquet.
Step 4: Configure the ADLS Gen2 as a Data Sink
- Navigate to the Azure portal and create a new ADLS Gen2 and make sure to set the Storage account kind to StorageV2 and enable the Hierarchical namespace.
- Inside the Striim App, Search for the Azure Data Lake Store Gen2 under Targets and select the input stream from above.
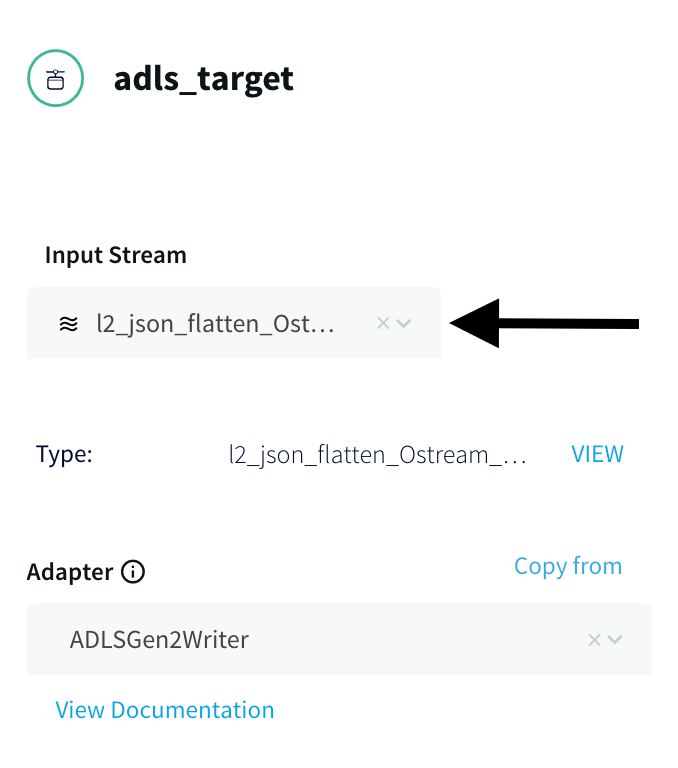
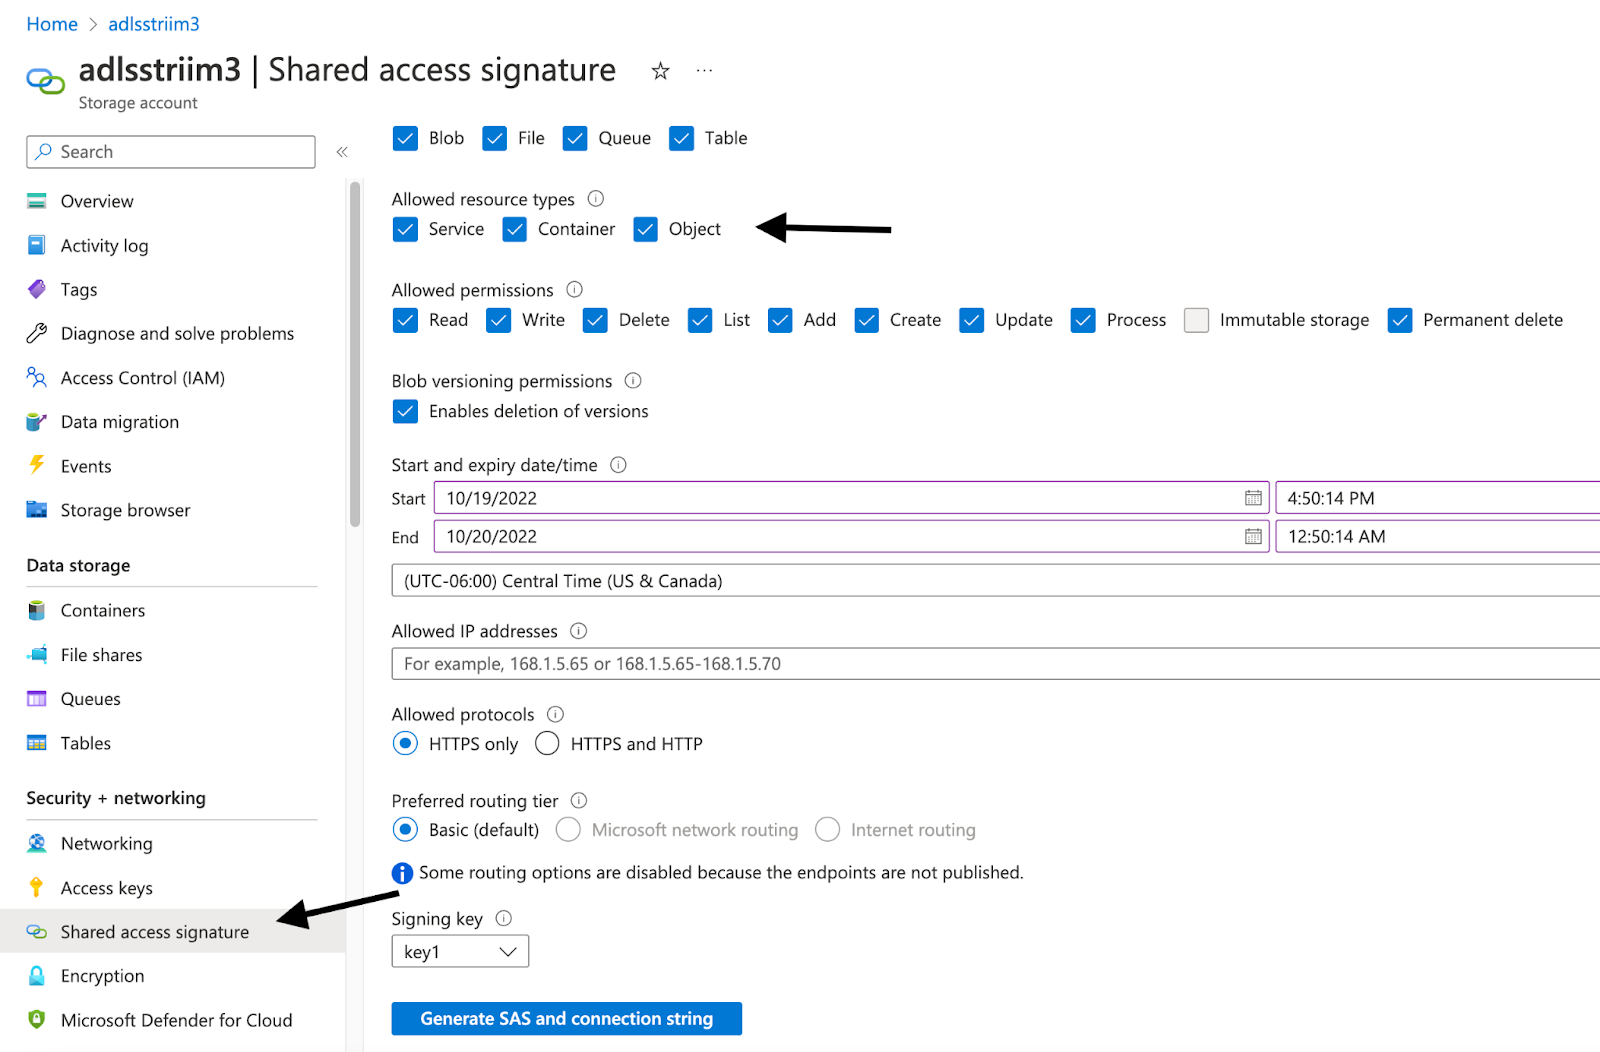
- Enter the Storage account name and Generate the SAS token by Navigating to the Shared Access Signature tab under the Security + Networking tab and Enable all three options (Service, Container, Object) as shown below.
Note:
Once the SAS key is generated, Remove the ? from the beginning of the SAS token before adding it into the Striim App. Refer to the ADLS Gen2 Writer documentation here.
For example,
?sv=2021-06-08&ss=bfqt&srt=o&sp=upyx&se=2022-10-16T07:40:04Z&st=2022-10-13T23:40:04Z&spr=https&sig=LTcawqa0yU2NF8gZJBuog%3D- Add the mandatory fields like Filesystem name, File name, and directory (if any), and also enable Roll Over on DDL which has a default value of True. This allows the events to roll over to a new file when a DDL event is received. Set to False to keep writing to the same file.
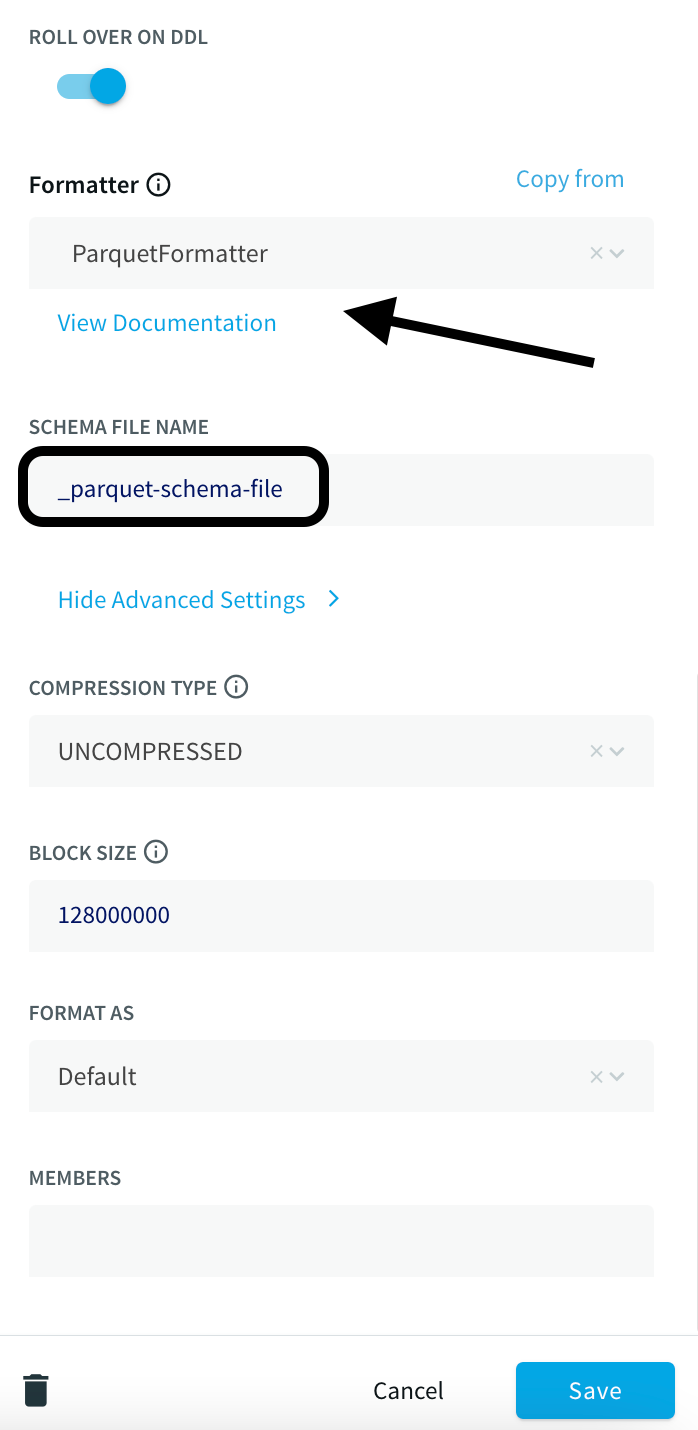
- Under the Formatter, Select ParquetFormatter option and provide a Schema file name and make sure to append _.
Note:
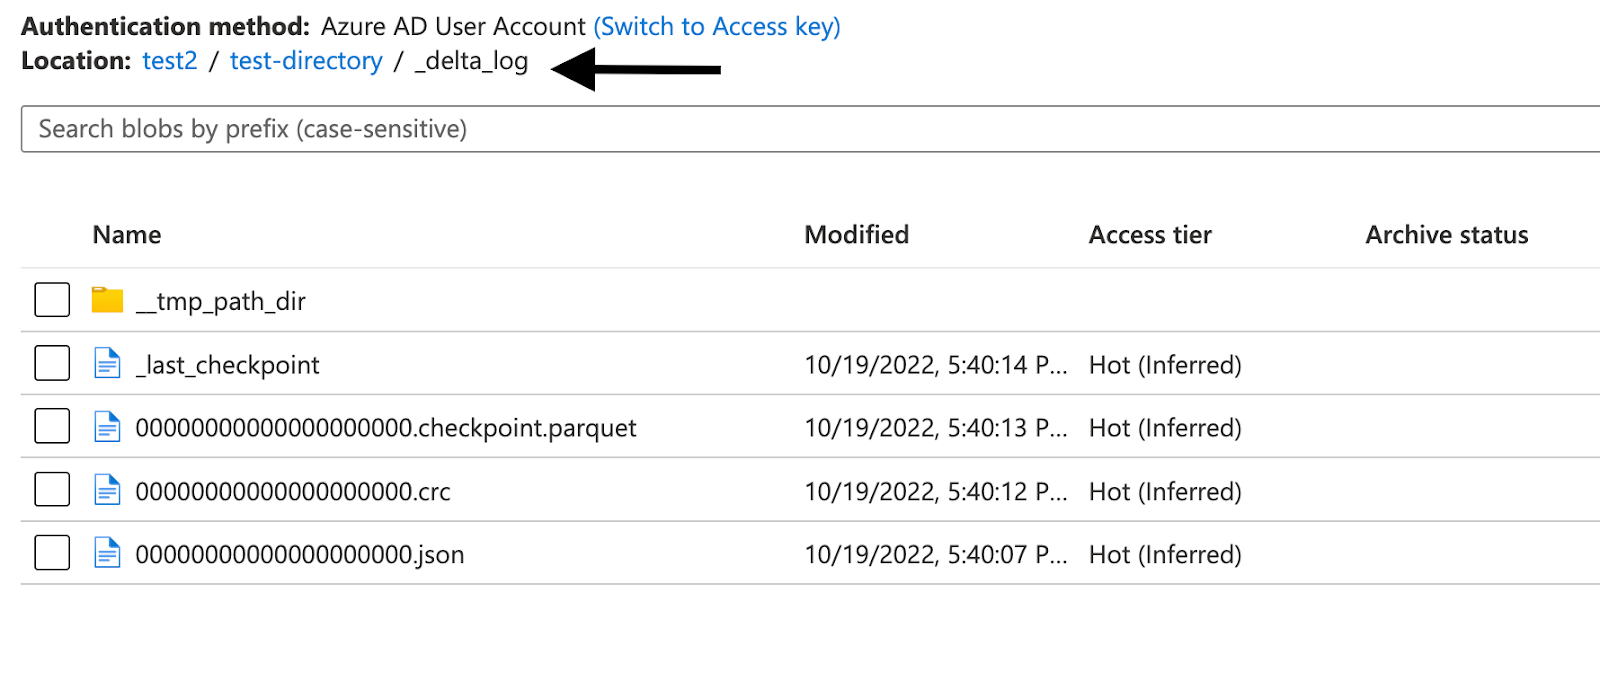
In the Downstream application of Databricks, we will be generating a Delta table in-place which will generate a _delta_log folder. All other files/folders will be treated as Parquet files along with the Schema file name folder that will be created by the Striim application during run-time.
By not appending the underscore value to the Schema file name in this use case will lead to a run time error during the creation of the delta table.
- Once the app is configured, Click on the Deploy App from the top menu and Select Start App.
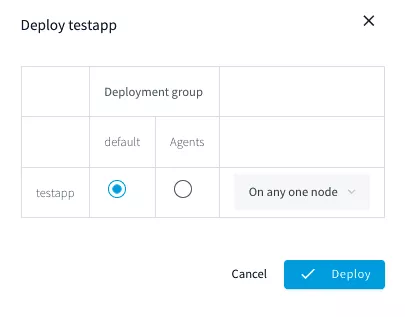
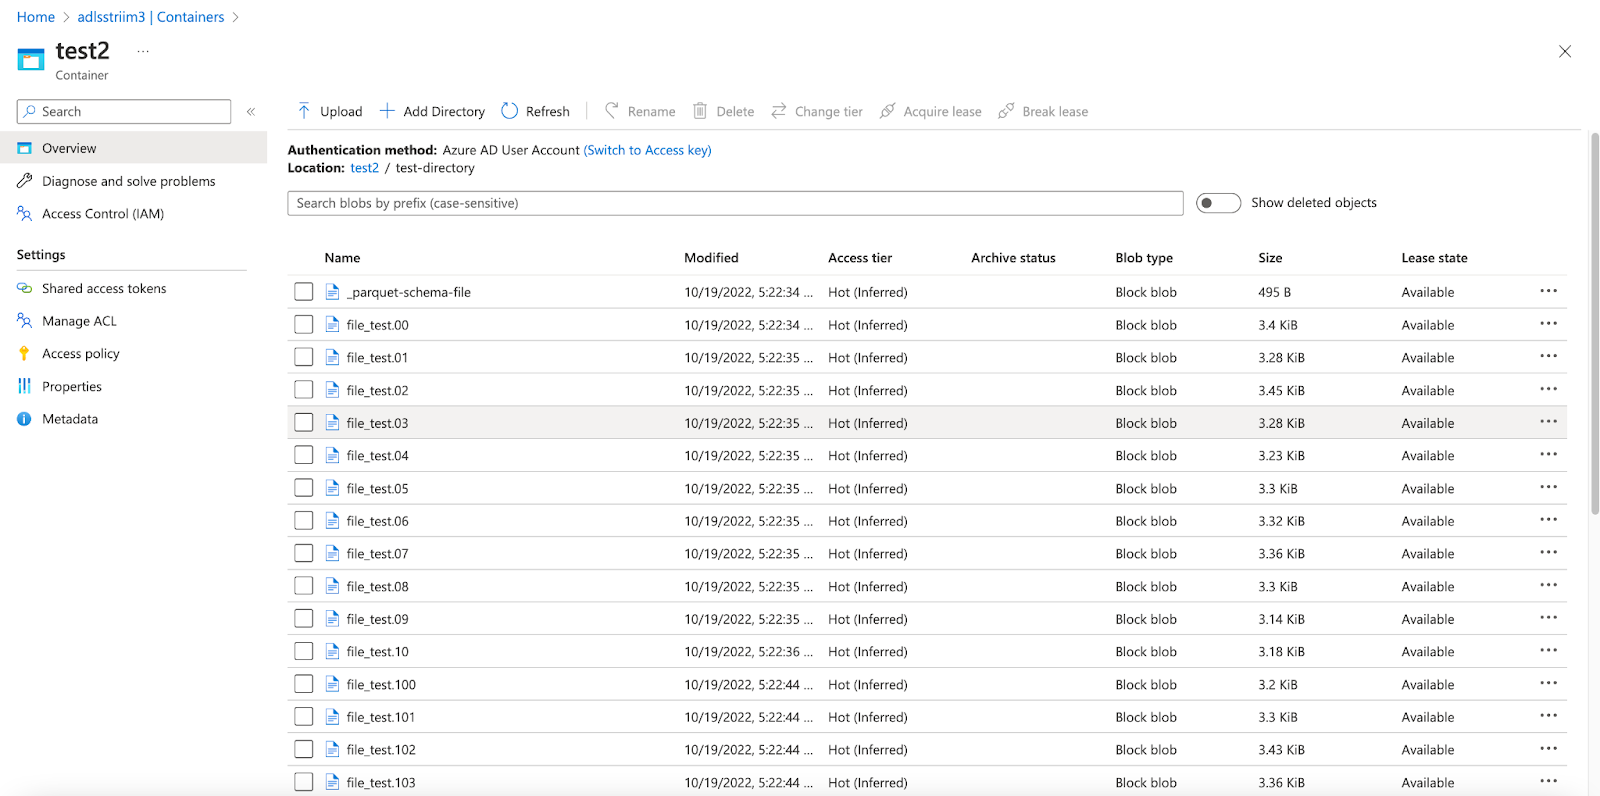
Once the app is deployed and Started, we can view the status of the data streaming via the dashboard. The parquet files can be viewed inside the ADLS Gen2 container.
Step 5: Convert Parquet to Delta
Navigate to your Databricks Homepage and import the notebook from this Github repo.
Databricks allows us to convert an existing parquet table to a Delta table in place and in this recipe, we will be pointing the Delta table to the ADLS storage container from above which receives the Parquet file dump.
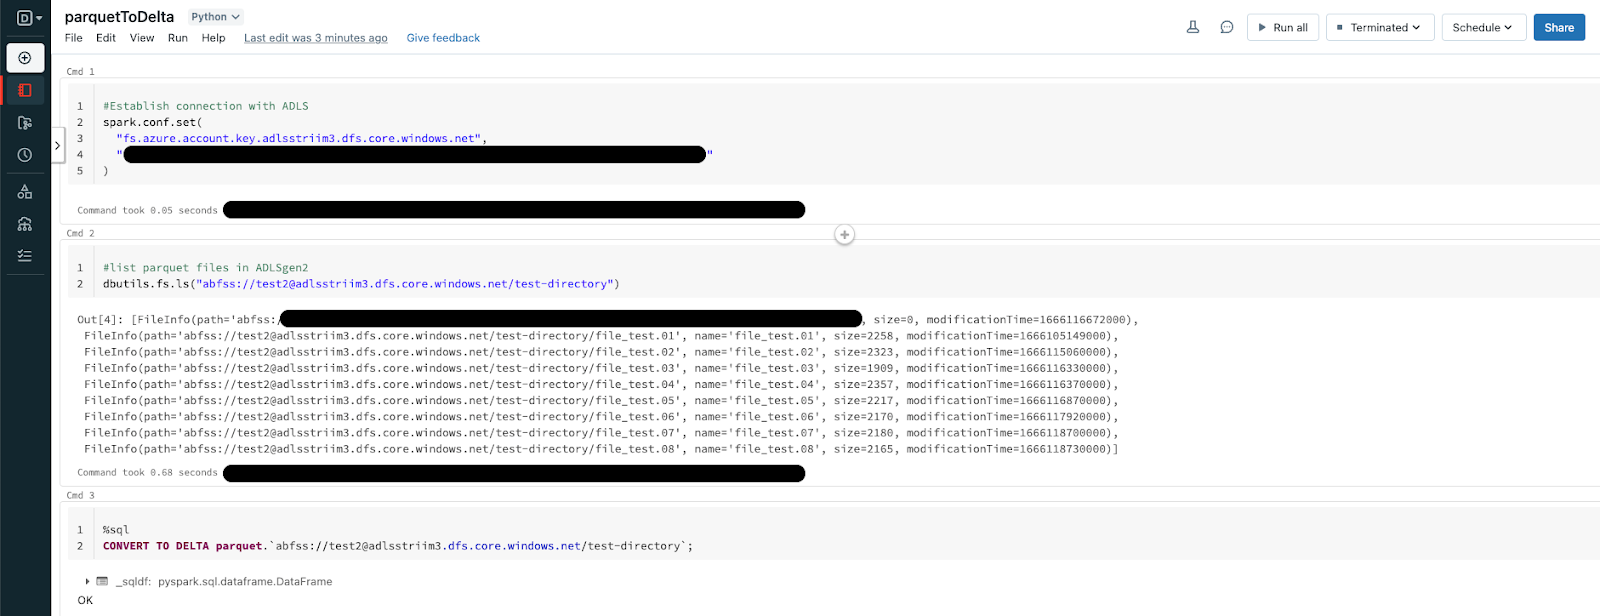
CONVERT TO DELTA parquet.`abfss://@.dfs.core.windows.net/`;Executing the above operation will create a Delta Lake Transaction log that tracks the files in the ADLS storage container. It can also automatically infer the data schema from the footers of all Parquet files. This allows for more flexibility when the schema is modified at the source allowing the Delta table to handle it seamlessly.
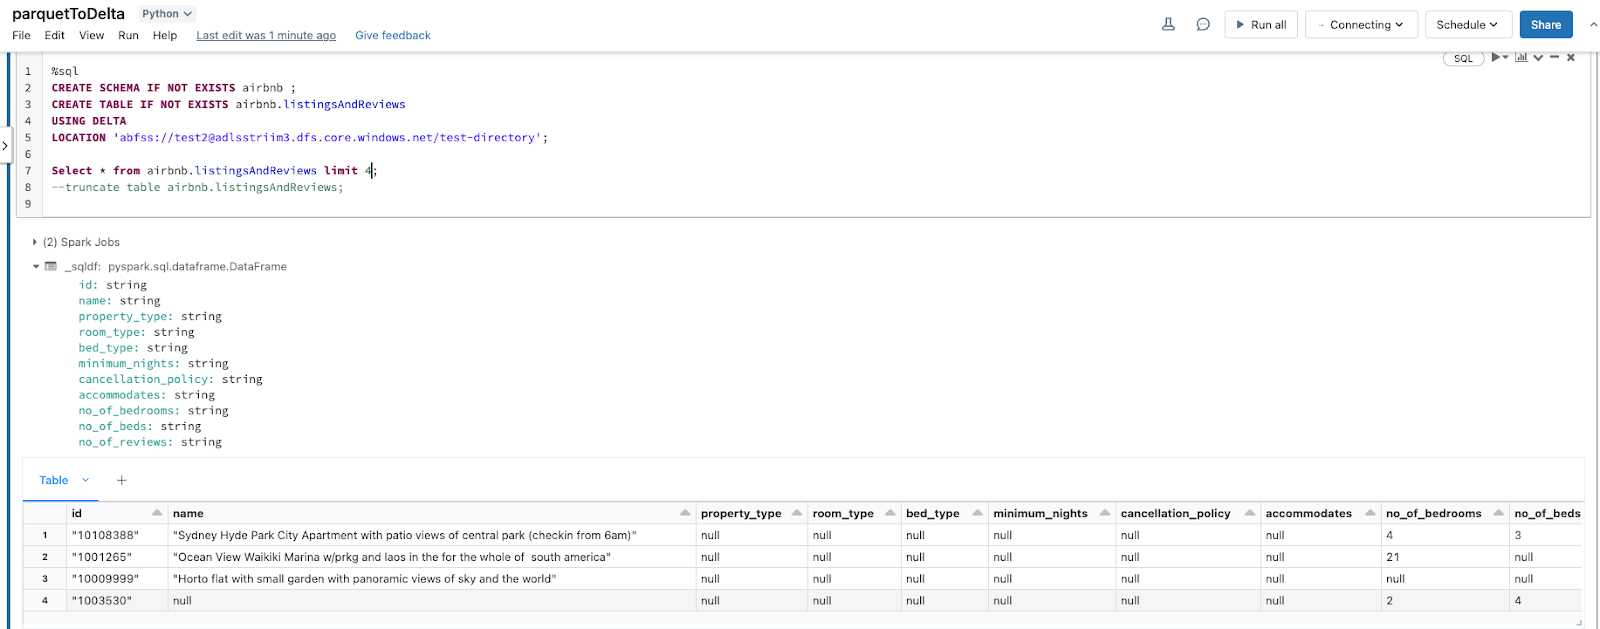
Next, we can go ahead and create a table in Databricks as shown below. An added advantage of using the Parquet file format is, it contains the metadata of the schema for the data stored. This reduces a lot of manual effort in production environments where schema has to be defined. It is much easier to automate the whole pipeline via Delta tables by pointing to the ADLS storage container.
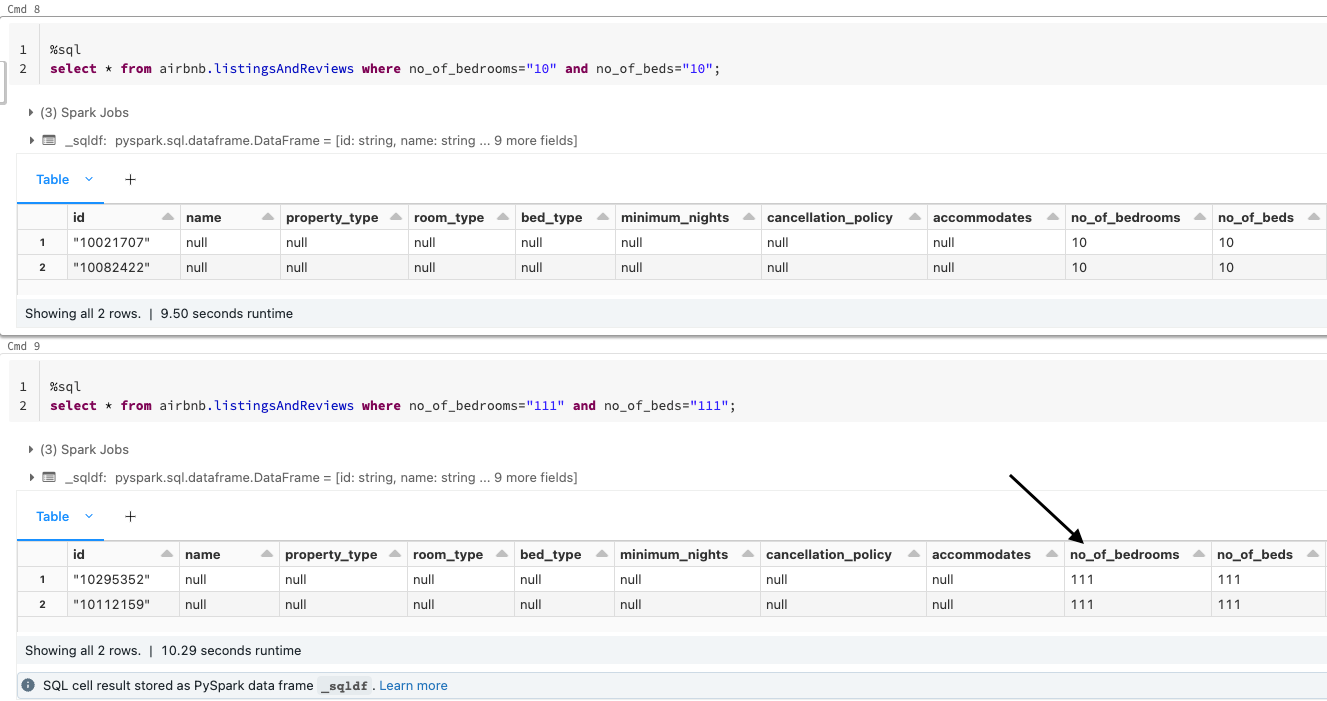
Once the _delta_log is created, any new Parquet file landing in the storage container will be picked up by the Delta table allowing for near real-time analytics.
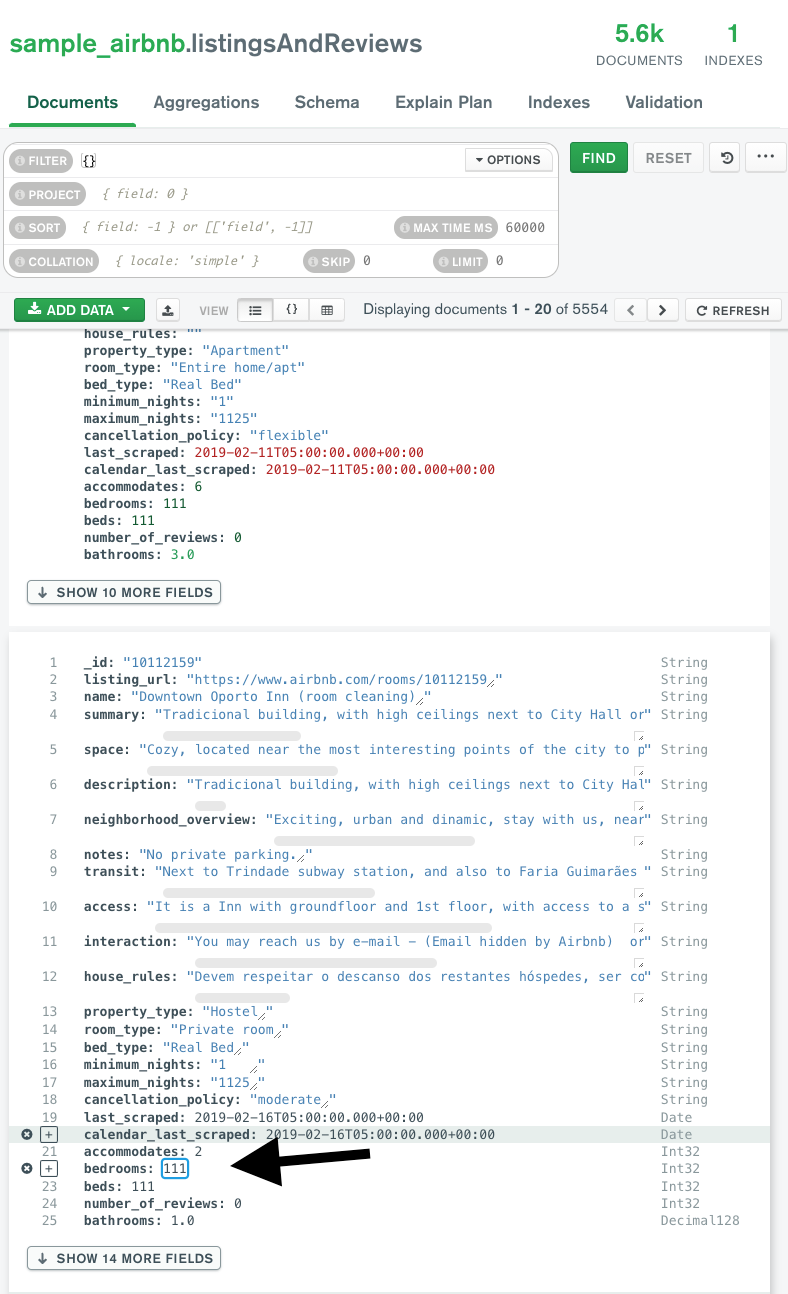
For instance, when the values for certain fields have been updated as shown below, Striim CDC application is able to pick up the CDC data and convert them into Parquet files on the fly before landing in ADLS.
Note:
For CDC testing purposes, avoid using the updateMany({....})with MongoDB since that would lead to error with Null IDs being generated.
Optimize Delta tables
The Parquet data files can be enhanced further by running the Optimize functionality in Databricks which optimizes a subset of data or colocates data by Column. If you do not specify colocation, bin-packing optimization is performed.
OPTIMIZE table_name [WHERE predicate]

[ZORDER BY (col_name1 [, ...] ) ]
Any file not tracked by Delta lake is considered invisible and will be deleted if the VACUUM operation is performed on the Delta Table. If the DELETE or OPTIMIZE operations are performed which can change the Data files, Run the following command to enforce Garbage collection.
> VACUUM delta.`<path-to-table>` RETAIN 0 HOURS
Limitations
While the above architecture is cost-efficient, supports open formats, and compatible with future analytics workloads, it has limitations around read isolation and data management at scale.
It can be further simplified by using Striim’s DeltaLakeWriter to handle copying data directly into Delta Tables with optimized merges and partition pruning for fast performance streaming into Delta Lake.
Step 6: Create Delta Live Tables (Optional)
Delta Live tables (DLT) is a Databricks offering that allows for building reliable and maintainable pipelines with testable data processing. DLT can govern task orchestration, cluster management, monitoring, data quality, and error handling.
Striim’s Delta Lake Writer writes to tables in Databricks for both Azure and Amazon Web Services. Additional documentation on Delta Lake writer properties can be accessed here.
The recipe can be further augmented using Delta Live tables which simplifies ETL/ELT development and management with declarative pipeline development.
- The main unit of execution in Delta Live tables is a pipeline which is a Directed Acycle Graph (DAG) linking multiple data sources. In this case, each table in a production environment can be pointed to an ADLS container.
- Leverage Expectations which allows us to specify data quality controls on the contents of a dataset. Unlike the CHECK constraint, Expectations provide added flexibility to handle incorrect data based on the constraints that are set instead of killing the whole pipeline due to bad data.
- Use Striim and Delta lake to create Streaming tables and views that reduce the cost of ingesting new data and the latency at which new data is made available leading to near real-time analytics.
- Leverage streaming data from Striim and Spark jobs in Databricks by using the ADLS storage container from the above recipe as the Raw/Ingestion tables(Bronze layer), create Refined tables (Silver layer) which apply any Transformations and then create Feature/Aggregate Data Store (Gold layer) for advanced reporting and real-time analytics.
To know more about Databricks Delta live tables feel free to explore here.
How to deploy and run this Striim Application?
Step 1: Download the TQL files
The Striim application’s TQL file is available from our Github repository which can import and Deploy the app on your Striim server.
Step 2: Set up MongoDB Atlas account and cluster
The sample dataset is readily available with the cluster once it is active. Configure the access roles/permissions for the MongoDB cluster and configure the connection parameters in the Striim Application.
Step 3: Setup ADLS and Databricks cluster
Set up ADLS gen2 storage container through the Azure portal and use the Databricks notebook from the Github repository.
Step 4: Deploy the App and Run the Databricks notebook
Wrapping up: Start your free trial
The recipe highlighted how Streaming Data from High-performance databases like MongoDB can be handled seamlessly and leverage Striim’s CDC capability and Parquet formatter to help enable the creation of Delta tables in-place.
- Leveraging MongoDB’s ability to handle different types of data and scale horizontally or vertically to meet users’ needs.
- Striim’s ability to capture CDC data using MongoDB’s OpLog minimizes CPU overhead on sources with no application changes.
- Use Striim’s Parquet formatter to convert Json events on the fly and leverage the Parquet file format that helps optimize the data. This helps in significantly reduce the Compute cost of using Databricks or any other application to convert the JSON data after it lands into Parquet.
- Leverage the same ADLS container where the data lands instead of mounting the data into DBFS or any other Data warehouse thereby reducing the amount of I/O costs which are crucial in any cloud-based environment.
Striim’s pipelines are portable between multiple clouds across hundreds of endpoint connectors including MongoDB, and Azure Cosmos, and also support other data warehouses including Google BigQuery, Snowflake, and Amazon Redshift.
Questions on how to use this recipe? Join the discussion on The Striim Community and also check out our other recipes here!
As always, feel free to reach out to our integration experts to schedule a demo, or try Striim for free here.
